
Lent is here. I half dread this time of the year. The sacrifice, formal confession, and self examination to prepare seem daunting and overwhelming. I've only been Catholic for a little under seven years now. The confessional still gives me butterflies. I can't eat until afterward. Shaking hands with a priest is intimidating to me. And the new responses at Mass...well I am already feeling anxious typing these words.
I take Lent day by day. Baby steps is what it takes to keep that Lenten promise. Getting back on the horse when you fall off brings you closer to getting it right the next time. Courage and asking for help keeping my faith through the unknown gives me strength to get through to Easter. Practicing my faith in my own way is something I am learning every day.
Since I am a doer and I work with my hands, I decided to do just that this Lenten season. I will craft.
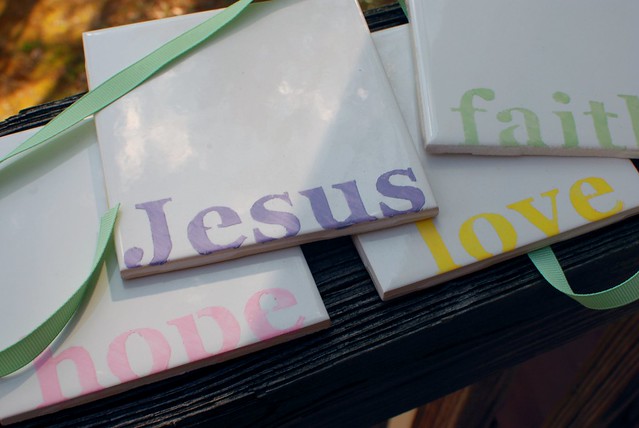
I've found so much Easter crafting inspiration on Pinterest. And I've found inspiration from God himself. No kidding, this craft came to me as I was praying. Just in a flash really. I think it was God mixing a bit of all my loves together. My love of color, love to try a new technique, and my new love for typography all flowed together to create these stenciled tile coasters for Lent.
Materials:
- (4) 4"X4" white ceramic tiles (I got mine at Home Depot in the tile-flooring section for 16 cents each.)
- enamel acrylic paints in different colors (or the same color) These paints are by Folk Art, and cost about $3 a bottle. The ones I used here are: 4028 Purple Lilac; 4003 Baby Pink; 4120 Soft Apple; 4017 Lemon Custard
- medium flat paint brush (the tip should be square, not pointy.)
- (1) sheet adhesive mailing labels 2"X4" or larger (and maybe another for mess-ups and printer jams, I used Avery 18163)
- A computer printer (and the computer to go with it...and a word processing program,) or you could hand draw your own letters
- X-acto knife (with sharp extra blades)
- masking tape
- A thick magazine you don't want to read (or you could use a self-healing mat if you have one of these nifty things.)
- An oven, like the big one in your kitchen
- (16) adhesive felt circles 1/2" diameter or smaller (or alternatively you can use some Fabri-Tac glue and felt scraps and make your own.)
How To:
1. Wash tiles with soapy warm water and rinse. Wipe dry.
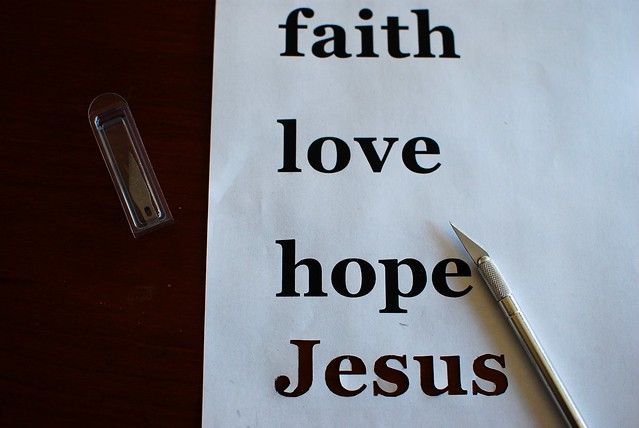 2. Using a computer printer, print on the adhesive mailing labels the words "love," "hope," "faith," and "Jesus." (Do a couple test prints first and see how large your words come out, and where they lie on the page. I was able to get each word, except Jesus, to fit on it's own label. This makes it easier later. Using MS Word, and Garamond font in 100 pt. with 24 pt spaces between each letter, I got something that fit well on the 4" tile. My left page margin was .5" and I didn't use the label wizard.)
 3. Place the labels sheet on the thick magazine and use an X-acto knife to cut out the black letters. (A patient hand makes the best round corners. This will be your stencil. For the letters with middle parts, like, "o," and "a," leave a small part to keep the middle piece from flying around. See my "e" above.)
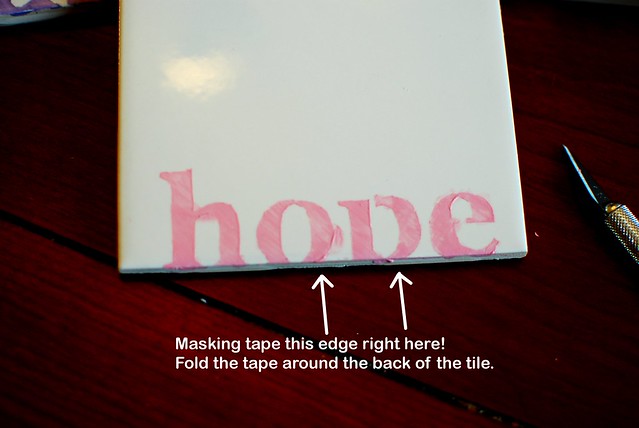 4. Cut a masking tape piece to fit along the bottom side edge of the tile. Place it on the side edge as below. Make one edge flush with the face of the tile and fold the tape to the back of the tile. If the tape peels up a little, this is not a problem since the stencil label will fold over the top of the masking tape in the next step.
 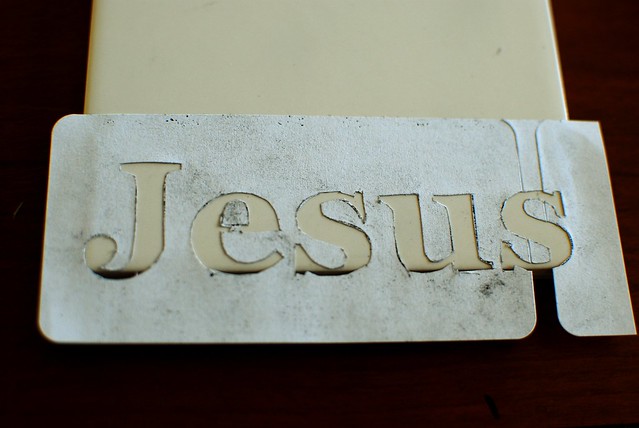 5. Carefully peel off the label backing, align the label-stencil along the masking-taped edge of the tile and press all edges of each letter so that they firmly adhere to the tile surface. (Press with the round back end of the X-acto knife and not with your fingers, to avoid getting oils onto the surface of the tiles. This will help prevent the enamel paint from streaking.) Fold the bottom edge of the label over the masking tape edge. I took a bit of artistic liberty here and made the letters drop off the edge of the tile to make them look like they were peeking up.
6. Gently paint over your stencil with the color of your choice. And let dry for about 30 seconds before removing the stencil and the masking tape. I had a terribly difficult time with this step. In lieu of pouncing, I decided I liked the brush stroke look. After tons of streaky finishes, I deduced that you should use the smallest amount of paint to get adequate coverage, wait until it barely dries, about 30 seconds, and then give it another very thin coat. Keep your brush strokes light and all in the same direction. Don't forget to brush out the paint that bunches up and collects in the corners because it will just makes lines and smears in the end. Remember to remove the stencil before the paint dries entirely, or else risk your hard work coming up like a bad sunburn-peel. AND, most importantly, don't let your four-year-old-crafter-in-training take over with her gloppy paint-ridden paintbrush!
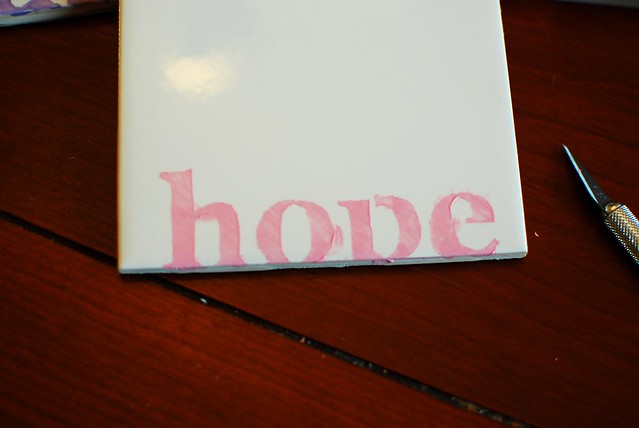 7. Use the X-acto knife to gently scrape off those smears, smudges, and imperfect lines, like the one on the "o" you see above. This part was so very satisfying. It was like cleaning, perfecting, and polishing all in one. Don't brush the bits of paint off the project. It will make your perfect lines peel. Carefully use the knife blade and point to remove the excess paint you scrape off.
  8. And presto, a clean stenciled tile.
9. To set the paint, the container says that you can let your work dry for 21 days or bake it for 30 minutes. If you are like me and you need blog pictures, let the tiles dry for 1 hour and then put them in a cold oven. Set the temp at 350 degrees F, and let the tiles and the oven warm up together. Set the timer for 30 minutes, after which turn off the oven and let the whole lot cool off. Remove your cool tiles from the oven and they are now handwashing/top-dishwasher rack safe.
10. Glue four felt circles to the underside of the tiles; one at each corner.

* * *
I am not really a coaster kind of person. I was thinking of attaching ribbon to the backs and hanging them up on hooks too. In the end I decided this might be best as a gift. And I have just the person in mind!
Outtakes:
This was one of the first times I've stenciled anything. It felt like rouge low-tack paint tape on dirty walls with all the seepage of paint under the stencil.
This paint stuff comes off the tile with some hot soapy water and a scrubbie. Near-perfection, was achieved after many, many re-do's.
My daughter decided to help mid-project. Not good. Too much paint. Everywhere!
I tried to re-use the stencil she used so I didn't have to X-acto knife the entire thing again. Word to the wise: don't do it. Do not reuse the stencils. Its messy, smudgy, and yucky.
I am not sold on the yellow in this color combo. Maybe its too spring-chick-like for me. And the green came out really, really light. I like the hue, but not the intensity. So if you are considering "green-apple" or "lemon custard" you might want to think again.
Inspiration:
If you've read this far...that's great! I thought I'd add in a couple of links to show my appreciation for some of the other artists out there who created the wonderful work that inspired this craft. Thank you!
Hand Painted Tile Coasters by Marangelie Caballero
Scrabble Tile Coasters LOVE by Terrills Tiles
 Hello, I am glad you came. Abbie Living is the place where I share my sewing, knitting, and crafting projects and most importantly, share my passion for helping others in need.


0 comments:
Post a Comment